|
Where to upload your files:
Configuring your FTP clients:
Understanding the web site file system:
CGI Based Programs:
The ins and outs of DNS and how it effects your domain:
Setting up and managing Sub-Domains:
Setting up Domain Email:
Where to upload your files:
The Home
Directory:
Your html files, and or the files you want to make
accessible to the World Wide Web must be uploaded to your
account. When you first FTP into your account, you'll be
taken to your "Home" directory. Don't confuse this with
your "web directory." The home directory is "not"
accessible to the World Wide Web; it's a private directory
where critical system files reside. DO NOT delete files
that have been created by the system, otherwise your web
site may disappear into cyber oblivion!
The
public_html
and
www
directory - (Where web accessible files are placed)
These are the two directories, where
files you want accessed from the web must be placed. Open
the folder "public_html" , which is your "web accessible
directory." The folder named "www" is actually a shortcut
to public_html, (both of them take you to your web
directory). Upload the files you want accessible to your
visitors and feel free to make the appropriate
sub-directories you'll require.

Configuring FTP Clients:
Configuring
Cute FTP
Based on version 4.2

Please note that there are a number
of older and current versions of Cute FTP floating around.
As a result, some of the instructions provided here cannot
possibly reflect all the versions, which have been
released in the past 5 years. The only small difference
you may encounter is where some of the options can be
found (depending on the client version you're using). In
any event, everything is pretty well much the same. Let's
get started:
1. Open Cute FTP
2. Select "File"
3. Select "Site Manager"
4. Select "New"
Options you'll see:
- Label for site: Enter a name for
this account. For example, "My Root
Account."
- FTP Host Address: www.mydomain.com
- FTP Site Username: Your main
system login name
- FTP Site Password: Your main
system password
- FTP Site Connection: Port: 21
- Login Type: Normal
Notes
About Cute FTP:
There are a few advanced features you may want to be aware
of. These features may need to be enabled if you're having
problems accessing your site via an FTP client. The
following will explain:
Trouble accessing your site via FTP:
This can sometimes occur if your accessing the Internet
from behind a firewall, personal router, or using an
Internet connection sharing system such as NAT (Network
Address Translation). This is often a class case scenario
in a home or small office where several computers are
being shared by one Internet connection. Symptoms
include, difficulty logging in via FTP, and or maintaining
a reliable upload or download session.
Use Passive Mode instead:
From your FTP main interface, select:
1.
Edit
(from the main dropdown
menus)
2. Settings
A dialog box called "Settings" now appears. Select:
3. Connections
4. Firewall
This opens the Connection/Firewall dialog box:
5. Check the box that says "PASV
mode."
6. Click OK
Don't touch any of the other settings
Ignore all other settings
you see here except for the "PASV_mode" setting!
Give it a try and see how it works. If you're still having
problems, you should contact your ISP to see if they can
make the necessary changes required for you to access your
site via FTP. There are a vast number of network
configurations ISP's sometimes use, and some of which that
can cause problems for users wanting to access the web
beyond that of a browser.
How to view all files in
your account (For Advanced Users).
Advanced users may want ability to view "all hidden" files
in their directories. While most of these are critical
system files, there are a few, which can be manually
edited by "Advanced Users." This is done by inserting an
entry into the "File Masking" feature in the client.
Unmasking Hidden Files:
1. Open Cute FTP
2. Go to the site manager
3. Select your account
4. Select "Edit"
A dialog box opens called "Site
Properties":
1. Check the "Enable Filter" box
2. Click the "Filter" button
3. Check the " Enable Remote Filters
(Server Applied Filer) " box
4. In the "Remote Filter" window, type this command
-a
5. Click ok
That's it!
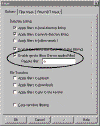
The -a command
will unmask "all" files in your web account.
Final
Note:
NEVER REMOVE OR ALTER FILES, WHICH HAVE BEEN CREATED BY
THE SERVER or C-Panel!! Unless you're an advanced user,
please leave all files that have been created by the
system alone! Doing otherwise could cause serious problems
with your account, and in some cases take it offline
completely. When in doubt "ASK", do not
Delete!
Setting Up WSFTP

Please note that there are a number
of older and current versions of WSFTP floating around. As
a result, some of the instructions provided here cannot
possibly reflect all the versions, which have been
released in the past 5 years. The only small difference
you may encounter is where some of the options can be
found (depending on the client version you're using). In
any event, everything is pretty well much the same.
Setting up WSFTP:
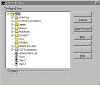
1. Open your WSFTP client
2. The dialog box "WS_FTP" Sites should display. If not,
click the "Connect" button.
3. Select "New"
You should see this dialog box:
You'll be
taken through these options:
1.
New Site/Folder: Choose a name for
this account
2.
Host Name or IP address:
www.yourdomain.com
3.
User ID: Main system login
4.
User Password: Main System Password
5.
Select
"Save Password."
6.
Select
"Finish."
Done! Your can now FTP into your site
Notes About
WSFTP:
Main Username and Password:
The main Username and Password was sent to you in your
welcoming email, and are also the same ones used to access
C-Panel. If you've changed your "main"
Username and Password before setting this
up, then use you must use them instead.
Trouble accessing your site
via FTP:
This can sometimes occur if your accessing the Internet
from behind a firewall, personal router, or using an
Internet connection sharing system such as NAT (Network
Address Translation). This is often a class case scenario
in a home or small office where several computers are
being shared by one Internet connection. Symptoms
include, difficulty logging in via FTP, and or maintaining
a reliable upload or download session. If this is the
case, try "Passive Mode."
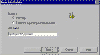
Setting
Passive Mode:
1.
Open the WSFTP account manager
2.
Highlight your account
3.
Select "Properties"
4.
Select
the "Advanced" tab
5. Check the box called
"Passive Transfers."
6. Click "OK"
Select passive mode, click
"OK", and try it again.
How to
view all files in your account (For Advanced Users).
Advanced users may want ability to
view "all hidden" files in their directory. While most of
these are critical system files, there are a few, which
can be manually edited by "Advanced Users." This is done
by inserting an entry into the "File Masking" feature in
the client.
Unmasking Hidden Files:
1. Open the WSFTP account manager
2. Highlight your account
3. Select "Properties"
4. Select the "Startup" tab
5. In the "Remote File Mask"
window, enter -a
The -a command
will unmask all files in your web account.
Final Note:
NEVER REMOVE OR ALTER FILES, WHICH HAVE BEEN CREATED BY
THE SERVER or C-Panel!! Unless you're an advanced user,
please leave all files that have been created by the
system alone! Doing otherwise could cause serious problems
with your account, and in some cases take it offline
completely. When in doubt "ASK", do not
Delete!
Understanding the web site file system:
index.html
and why you should use it:
This again is where a number of
newer webmasters become stumped. They upload all of their
files and directories, and then want to access them with
their browser, but forgetting to create their welcoming
page as index.html, so here's what happens: They access
their site as
http://www.mydomain.com/ or using the associated IP
number, for example,
http://test.html/, and what they see is their entire
file directory structure! Yikes!… It looks just like
exploring the C drive on your computer! You don't want
visitors seeing that, do you?
When you access your site by calling it as
http://www.mydomain.com
or
the assigned IP (for example),
http:// 217.74.132.26/, the web server looks for
the "index.html" file as the (default file) to be sent to
visitors, and thus this is why
http://www.mydomain.com/ by itself will
automatically display the home or welcoming page. It's
because the server automatically looks for index.html
whenever a domain or directory is called without a
filename appended to it such as this,
http://www.mydomain.com/file.html
If it can't find index.html, it will simply list "your
entire web directory" to everyone that access's it, which
is a MAJOR security risk! ALWAYS, use an "index.html" file
in any directory you create, including your "root" web
directory. In general, it's always a good idea to use "index.html"
as your main page in "all sub-directories" of your
account. Forgetting to place an index.html in your root
web, or any subdirectory of your web for that matter will
effectively leave all of its contents viewable to the
world.
Understanding case sensitivity:
Another small detail, which can
throw many newer users into a tailspin. Unlike your local
PC, the Unix file system is very particular about
"uppercase" and "lowercase" file names. Therefore, if you
were to install a script, (let's say the wwwboard
discussion forum) for example), the name of this script
would be wwwboard.pl. If you name a file picture file
called me.jpg, then this is what you must call it as.
Naming it me.JPG for example, (observe the uppercase)
tells a Unix web server to treat it as a totally different
file name.
Unix file servers are exceptionally fussy on this issue,
so make sure you pay close attention to "case' when
uploading files, or installing and configuring cgi based
scripts. The same rule applies for all files including
your .html pages. Again, the server treats .html and .HTML
as two entirely different files. Want to keep in simple?
Try to stick with lowercase letters in all file names and
extensions.
Uploading your files in the
correct mode (ASCII or Binary)?
Uploading in the wrong format for images or binaries will
result in a strange mess appearing in place of the file.
For CGI scripts, this mistake has to be the most common
cause of that annoying error known as the (Server 500
Error - Malformed Headers), or something to that lovely
extent. While this can be the result of many various
programming errors, the most popular amongst new users are
uploading their scripts in the "WRONG" format. Your cgi
scripts "MUST" always be uploaded in ASCII mode.
Alternatively, if you upload an image or .exe file, it
must be done in "BINARY" mode.
The difference between ASCII
and BINARY?
In short, html or text based files are supposed to be
transferred in ASCII mode. Uploading them in Binary mode
will append ^M's to the end of every line. In most cases,
this is OK, with html files because your browser will
ignore them. BUT, with other text files such as cgi
scripts, uploading them in binary will damage them, thus
causing a (server 500 error). This is because binary mode
has added ^M's to the end of every line, which are not
supposed to be in the program. This of course, is what
causes the additional message of (Malformed Headers),
which often displays at the bottom of the "Server 500"
message when a CGI script has crashed.
Once again, BINARY mode is used for transferring
executable programs, compressed files and all
image/picture files. If you try to upload an image in
ASCII mode, you observer a strange mess appearing on the
page where the image is suppose to appear. ASCII mode in
this case, has corrupted the binary coding in the jpeg or
gif image. If this happens, just re-upload it in the
Binary format
Setting your FTP client to automatically detect ASCII and
Binary file transfers:
Most FTP programs have "AUTO" mode, which will tell the
FTP client to automatically detect the file type you're
transferring and will select the appropriate mode. By
default, most FTP programs will attempt to transfer
everything in binary mode, but when "Automatic" is
selected, the FTP client will check a list of known ASCII
extensions, (for example, .pl, .cgi, .txt). If it detects
one of these extensions, it automatically switches to
ASCII mode.
By Default, most of the well-known files to be uploaded in
ASCII are already entered, however you can manually add
additional extensions that you would like to transfer in
ASCII mode by selecting the feature called "Extensions."
Here, you can any additional extensions that will cause
the FTP client to toggle to ASCII mode automatically upon
detecting an extension entered in its list. Remember, you
must set your transfer mode to "Automatic" for this to
work.
File
types and what they represent:
Various file types can effect both the behavior of your
files, as well as how the server treats them. While there
are numerous file extensions, which represent a host of
various file types, we'll stick to the basic ones in this
quick overview:
The .html file:
This is one is the most commonly used and the most one of
you are already familiar with. Html stands for (hypertext
Markup Language). Essentially, it tells the server, as
well as the clients browser to process and display the
.html coding in a way, which is meaningful to the end user
through a browser.
The .htm file:
Many of you have probably noticed this newer extension
appearing in place of the traditional .html one. In short,
.htm is most often created, and or generated from the
Microsoft FrontPage web editor. The two are essentially
the same and provide the same basic purpose. Unless you're
using FrontPage, you will probably use the .html extension
at the end of your web pages.
The .gif and .jpg file:
Most commonly used because of its good compression in web
page images. Generally, .gif files are the fastest
loading, as they remove a lot of information, which is not
required to maintain image integrity, but to a point
however. .jpg will allow more flexibility in compression
and quality settings, however can also result in larger
files.
The .CGI and the .pl file:
.cgi and .pl are most often used for perl scripts. Perl
scripts are small text based programs, which are executed
on the server end, and will perform a host of interactive
functions for a web site. In short, when a .pl or .cgi
file is called, it tells the server to process it using
the "Perl Interpreter." The Perl Interpreter understands
the programming within the script, and will perform the
set of sub routines, which will yield your desired effect.
This desired effect could be anything from a simple web
page counter, to more complex programs such as discussion
forums, e-commerce platforms, to online auctions. In many
cases, you can download these "ready to go" scripts for
free, and in others you may have to purchase them.
FrontPage
and FTP:
If you're planning on using
Microsoft FrontPage to manage your web site, there are a
couple of issues things you may want to keep in mind:
There are two worlds. The General Unix hosting world, and
the Microsoft world. While this is not necessarily a bad
thing, Microsoft had indeed decided to play by its own
rules. As a result, FrontPage does not always conform to
the rules of Unix, so you should be extremely careful when
accessing a FrontPage web via FTP. It's easy to damage
the FrontPage web, as well as it's associated server
extensions, and if it happens, you may loose the ability
to administrate it from your FrontPage Explorer. To avoid
problems like this:
-
Do not
alter, or delete files that are part of a FrontPage web
-
Do delete,
move, or alter directories ending in _vtf. These are the
FrontPage extensions
The ultimate solution:
If possible, try to create your FrontPage webs in
sub-directories of your root. For example,
http://www.yourdomain.com/home. This way, you can
safely FTP into your root account to perform other tasks,
while avoiding the FrontPage webs, which are safely out of
the way in their own separate homes. Remember! DO NOT
delete any folders, which end in _vtf! This will kill your
FrontPage web, and we'll have to reinstall the extensions
for you. For additional information on FrontPage,
please see our dedicated tutorial on it.
Using
CGI programming:
Where to place your CGI
scripts:
Although there is nothing dangerous about placing cgi
scripts in random directories throughout your site, it's
best if you keep them in their own little home known as
the cgi-bin. This minimizes security risks and allows you
to maintain your cgi programs from one directory.
The path to Perl:
One of the first things you must do when configuring a
script, is set the correct path to the Perl interpreter,
which is the engine responsible for processing the script.
The path to Perl on our servers is: #!/usr/bin/perl
The path to Sendmail:
Some programs such as the ones, which send email will need
to know where the Sendmail program resides on the server.
The script will typically have a setting like this: $mailprog
= '/usr/sbin/sendmail'; and will want you to set it
appropriately. Sendmail on our servers can be found here:
/usr/sbin/sendmail or /usr/lib/sendmail.
Setting directories within
your cgi scripts:
When you configure a cgi script for "any" server, it may
ask you to set variables such as the base, relative, and
CGI directory/url settings. Here's an "example" using Matt
Wright's wwwboard.pl script. Obviously, each script may
vary, but this should provide you with some basic idea:
$basedir = "/home/yourlogin/public_html/wwwboard";
$baseurl = "http://www.MazeCreatorHosting.net/wwwboard";
$cgi_url = "http://www.MazeCreatorHosting.net/cgi-bin/wwwboard.pl";
Most scripts come with documentation on how to set these
directories. Please make sure you read and understand it
before configuring the script. New to cgi? Here is a page
with questions and answers to numerous questions evolving
around the inns and outs of using cgi within your scripts:
http://www.w3.org/Security//www-security-.html
Another excellent site, which provides step by step
chapters is:
http://www.cgi101.com/class/
Understanding File
Permissions:
There are a number of file permissions, which can be used
for a variety of different purposes, however we'll limit
this tutorial to the ones most commonly used. To begin
with, it's important you understand the three categories
of permissions, which are:
Owner Permissions:
The owner is you. In most cases, this is not so much of a
concern, as you can only obtain owner permissions in one
of two ways. 1. FTP into your account using your Username
and Password. 2. Login via Telnet with the same
information.
Group Permissions:
The represents a group of users who have access to a
particular directory. For example, a password protected
directory, whereas only members can access it upon
providing the correct Username and Password. In this case,
any permissions you assign to "Group" would be applicable
to users with access to that particular directory.
Public Permissions:
This is the most important one of all. Public permissions
determine what your world wide visitors can and cannot do
with your files. ALWAYS make sure you understand what a
particular permission does before assigning it to a file.
If not, you may wakeup to find your website demolished by
some clown who was snooping about and gained access to
your files.
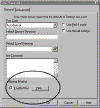
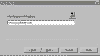
Setting File Permissions:
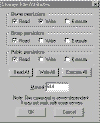
To set file permissions:
1.
Login with your FTP client
2.
Open the
directory where the file you wish to set permissions on
resides
3.
Right
click on the file and select CHMOD
A box similar to the one above will appear
Observe how you can "select" the
individual permissions you want, or simply enter the 3
digit number if you know what it is. Most instructions
included with downloaded scripts will tell indicate this
to you.
By default, all files uploaded to
the server automatically have permissions set to 644. The
setting 644 is relatively safe, as it provides "Read" and
"Write" access to the owner, while limiting the rest of
the public to "Read Only" access.
When setting permissions for cgi scripts, the most common
permissions setting is 755. 755 allows the owner "Read
and Write" access, while allowing the Group and Public
"Read and Execute" permissions. So what are we actually
saying? In short, when users access your cgi script, the
server has been instructed to grant them permissions to
"Read and Execute" it. Sound scary? It's not actually…
Remember that a script is a program that must be processed
by the server. As long as the script is written properly,
you can safely allow users to execute it, and thus
providing the desired results. For example, if they wanted
to post a message to your wwwboard discussion forum, then
they would need these permissions to execute wwwboard.pl,
which would write their new message to an html file, which
is displayed on the main forum. The new message would
reside in a directory on your site so other users could
view it. Most cgi, perl and other scripts you'll be
installing come complete with instructions telling you
which permissions you'll need to set them to.
WARNING!
Setting permissions on files is a relatively simple task,
however MAKE SURE you fully understand what it is you're
allowing the public to do with your files. For example,
some less experienced users often make the fatal mistake
of simply setting ALL of their files to 777. While 777
will automatically allow executing privileges, it also
allows full "READ, WRITE, and EXECUTION ability to the
entire world!!!!
This is how web sites get hacked! While most visitors have
good intentions, all it takes is one person whom snoops
about your files seeking an "Open Back Door." This could
result is them gaining full access to your directories,
which means they can do anything from deleting your entire
site, to defacing it with obscenities.
New to cgi? Here is a page with questions and answers to
numerous questions evolving around the inns and outs of
using cgi within your scripts:
http://www.w3.org/Security//www-security-.html
Using Server Side Includes -
SSI
SSI works in conjunction with a web page usually with the
.shtml extension. The .shtml extension tells the server
to do something different with the web page. When you
append the .html or .htm extension, this tells the server
to "read" the page only. The .shtml extension tells the
server to "Execute" the page, in addition to just reading
it.
So, why would you want to execute the page? There are
various commands you can program into a web page, which
the server will look for and parse when the file is called
as .shtml. In many cases, this mode is used in conjunction
with Server Side Include (SSI) tags, to call a CGI script.
For example, you have a visitor counter script, and we'll
call it count.cgi. Every time someone visits your website,
you want the script to be called, so that it logs the
visitor into a file.
To do this, you would place an SSI tag into your web page.
The tag in this case, would look something like:
<!--#exec cgi="/cgi-bin/count.cgi" -->
This small tag, which is hidden in the html coding of your
page is telling the server to:
1. Go to the cgi-bin
2. Execute count.cgi
That's it! The information has been captured and processed
by the count.cgi script. Of course, that's the short
version of what happens. The long version would no doubt,
would take us far beyond the scope of this document.
PLEASE do not use the .shtml extension on "all" of your
web pages unless it's absolutely necessary. With a busy
web site, this means that every page must be executed, as
opposed to just read. This as you can appreciate, can add
considerable memory and CPU load to the system. As always,
read the instructions that came with your script
carefully. They should provide specific instructions on
how to configure the script, as well as the SSI tag.
The
ins and outs of DNS and how it effects your domain:
Understanding
DNS and Name Servers:
This is an area, which causes a
great deal of confusion amongst both webmasters and end
user clients. Before we go any further, let's look at this
quick analogy: DNS can be considered something similar to
that of a phone book. When you move from one location to
another, your last name stays the same, but your phone
number may change. In order to point your name to the new
phone number, you must contact the telephone service
provider, which will assign you the new phone number. In
addition, they update all directory information data basis
to reflect you as pointing to this new phone number.
What
is DNS?
DNS stands for "Domain Name Server." The domain name
server acts like a large telephone directory in that it's
the master database, which associates a domain name such
as (http://www.mydomain.com) with the appropriate IP
number. Consider the IP number something similar to a
phone number: When someone calls
HTTP://WWW.MazeCreatorHosting.net/, your ISP looks at the DNS
server, and asks "how do I contact MazeCreatorHosting.net?" The
DNS server responds, it can be found at: 157.238.96.231.
As the Internet understands it, this can be considered the
phone number for the server, which houses the HTTP://WWW.MazeCreatorHosting.net
web site.
Where are all of the DNS
records kept?
This is slightly more complicated, but for the purpose of
this overview, we'll try to keep it as general as
possible. There are 2 basic places DNS records reside:
International Root name servers (13 exist throughout the
world)
Your domain register, where your current DNS settings
reside.
When you register/purchase your domain name on a
particular "registers name server", your DNS settings are
kept on their server, and in most cases point your domain
to the Name Server of your hosting provider. This Name
Server is where the IP number (currently associated with
your domain name) resides.
The entire hierarchy is somewhat involved, but in short,
the world Root Name Servers can be considered the master
listing of all DNS records, and there are currently 13 of
them in the world. These name servers are where all the
master DNS records are kept. The DNS server of your ISP
will typically query the Root Name Servers once every
24-hours. This is how they update all of their DNS tables,
which in turn, resolve www requests to the IP number of
the server they reside on.
Changing your Name Server settings, so your domain points
to your MazeCreatorHosting.net
account:
Your "Name Server Settings" must be updated to point to
your account on MazeCreatorHosting.net. You originally purchased your
domain name from a register, and this register is where
your current DNS settings reside. That is, unless you
transferred your domain name to an alternate register, in
which case, you would control your DNS settings from
there.
The "Register" your domain resides on, communicates your
'current' DNS settings with the International Root name
servers, which is turn share this information with ISP's,
routers, and cache engines around the world. In essence,
it's like a worldwide directory that other computers can
refer to when they want to match a domain name with its
associate IP number. This IP number is how the particular
server your website resides on is located.
Accessing your domain
manager:
Simply go to your domain registers web site, and look
around for links, which point to something like, domain
manager, manage domain, or something of that
administrative nature. In your welcoming email, you were
sent DNS settings, which look similar to this example:
NS1.MazeCreatorHosting.net 69.57.152.164
NS2.MazeCreatorHosting.net 69.57.152.165
Most of the newer registers such as the (OPEN SRS) based
entities have turned this into a 5-minute process. You
simply login to the register, select 'manage domain' and
you'll be presented with an option to update your new DNS
numbers. Contrary to popular belief, Network Solutions
'now' also provides an online interface to change these
settings, so this process with them is no longer as
complicated as it use to be, however it's still not as
simple as the OPEN SRS based systems. If your particular
register 'does not' provide a domain manager of some type,
then you'll need to send them a message requesting a
change of DNS. This is an unlikely scenario, as most every
register now allows you to manage your own domain settings
from a web based interface.
Once you've accessed the "management interface" of your
domain name, look for a setting, which says "change or
manage DNS settings." In most cases, you can simply cut
and paste the DNS settings we've sent you directly into
the spaces, which correspond to your DNS management
settings. Remember, the DNS settings we're displaying here
are an "example."
The 3 to 4 day propagation
period - Understanding what happens during this time
frame:
In short, patience is a virtue. Remember what we talked
about earlier in this chapter regarding the shear size and
scope of the worlds DNS system? In short, when you change
your DNS settings, these new settings must propagate
throughout the worlds DNS servers. It also means that
every ISP (Internet Service Provider), must update their
DNS records to reflect these new changes, which in most
cases, is done automatically every 24 hours, but not
always however...
Where
do the Root Name Servers receive their information from?
The Root Name Servers will query "domain registers"
several times a day. Domain Registers, being entities such
as Network Solutions, and the newer OPEN SRS based
systems. The Root Name Servers will gather this
information from the many registers now in existence, and
update their master records accordingly. Now your ISP must
access the Root Name Servers, and update their DNS
records, which reside on their 'local' DNS server. This
process is fully automated and most ISP's will check the
Root Name Servers for updates every 24-hours. Beware
however, that some lame ISP's will delay this process for
as much as 2 to 4 days in some cases. If that happens, it
will no doubt cause additional confusion, as everyone else
will be reaching your new account on our servers except
you. This is because your ISP has not updated their DNS
records, and or have not cleared their DNS cache, which
means they'll still be pointing your domain name to your
old server. If it's a new domain name you've registered,
then you'll receive a blank "Site Not Found Page."
DNS Cache and your ISP:
There is also the issue of DNS cache, which is something
we won't go into great detail about here, but here's the
short version. Every time you access a site from your ISP,
they cache the URL, as well as its associated IP number.
If their network is properly setup, these DNS cache
records should "Expire" at least every 24-hours. If they
did not (which is often the case), you'll experience this:
You enter your
http://www.mydomain.com/ URL, and it keeps taking you
back to your old server account.
In a large number of cases, it's the result of an ISP who
"Did Not" configure their servers to "Expire" the DNS
cache records at the appropriate intervals. Unfortunately,
this adds additional confusion to their clients, and
especially the ones whom are trying to point their domain
name to a new server. Yes, it will make you want to scream
sometimes, however if you understand whom is actually at
fault, then you'll know who to scream at :)
The DNS propagation process
is not limited to ISP's!
HA.. Just when you thought you had it all figured out!
Unfortunately, there's more folks. The Internet itself
must update/clear its DNS cache as well. When we say the
Internet, we mean the numerous intermediate "points of
access" you're routed through before reaching your final
destination. For the most part, these intermediate points
of access consist of "Internet Routers" and "Internet
Caching Engines." These too, maintain their own DNS cache,
which assists them in routing traffic/resolving URL's to
the correct destination IP's. Don't worry though, as
Internet routers are usually faster at clearing their DNS
cache than ISP's are.
What to expect during this 2
to 4 day propagation period:
In most cases, the propagation process will take at least
48 hours to complete. The first thing that happens is the
"World Root Name Servers" will check all of the various
"Domain Registers for updates. Ok, so now the Root Name
Servers have done their job. The rest of it is up to the
many ISP providers who "should be" updating their DNS
records (at least every 24 hours), but a number of them
will not.
Side effects that can be
expected during the propagation time frame:
It's perfectly normal for strange things to happen within
the 48-hour propagation period, but sometimes longer.
While we could provide a full list of all the anomalies
that can occur during the DNS propagation period, we'll
stick to some of the most common scenarios that most
people experience:
HELP! My friends can reach my
new site, but I'm still being directed to the OLD ONE!
This is a class case of your friends ISP (who did update
their DNS records), but yours unfortunately did not. As a
result, your ISP is still pointing your domain name to the
old DNS record, which is your old hosting account. Wait a
couple of more days, and if it appears that everyone but
you can access your new account, then contact your ISP and
tell them to expire their old DNS cache records.
WOW! http://www.mydomain.com was
taking me to my new MazeCreatorHosting.net account just a minute ago,
but when I try it now, I'm being taken back to my old
hosting account - what's up with this?
In all likelihood, your ISP may be in the process of
clearing their DNS cache, and or updating their local DNS
server records. During this small interval, it's normal to
fluctuate between the new and old web site, as the old DNS
records may not have completely expired from their cache
yet. Give it another several hours and it should be fine.
HEY! My
new site comes up for me, but my friends are being
directed to my old one!
Break out the coffee and donuts, and consider yourself
lucky. Your ISP is on the ball and updates DNS records/
clears DNS cache in short regular intervals. Your friends
may be using an ISP, which is not as fast, and or
efficient at doing so. The only remedy for this is time.
Eventually, the other ISP's DNS cache will expire and be
replaced with the updated DNS records.
What's going on with my email?
When I try to access it, I receive a "host does not exist"
or a "cannot authenticate" error message.
This can happen for a number of reasons, but in most
cases, it's because your new DNS records have not fully
completed the propagation process yet. Consequently, you
may be trying to access your old email account on your
"old server", which you may have already cancelled, or
it's in a state of DNS flux, which means it points to the
new server one moment, and the next, points back to the
old server.
Give it some more time and it will eventually settle down.
In the meantime, consider accessing email from your
account using the WebMail based reader. If your domain has
not propagated as of yet, you can access your email
account via WebMail with your IP number. Example:
http://12.23.36.78:2082/neomail/neomail.pl This will
allow you to access your default mailbox on your account.
Replace the IP number with the one we sent you, and do not
remove the :2032 port number in the URL.
Microsoft FrontPage will not
accept a Username and Password, or displays the error
message (FrontPage Extensions Are Not Installed).
While you should be able to access FrontPage with your
associated IP number (until your domain is resolving to
our servers), this is not always the case. FrontPage can
behave in a number of different ways depending on which
direction the wind is blowing. In some cases, it will
allow you to initiate an upload session, but upon asking
for your Username and Password, will not recognize them.
If this happens, the best thing to do is wait until your
domain name is answering to our servers. One thing we know
for sure, is FrontPage will work without much of a problem
if you're using the full www.mydomain.com URL to manage
your site with. Feel free to try it with your IP, but we
cannot guarantee it will work.
It's been over a week. Everybody
else can access my new site except me!
Was your domain originally hosted by your ISP? If so, they
may not have deleted this entry in their DNS files. This
results in you, and or anyone else accessing the net from
this "particular ISP" being directed to your old web site
on their servers. A number of ISP's forget this small
detail, which can result in weeks of utter confusion and
frustration. If this is happening to you, contact your ISP
and make sure they've made the necessary changes to their
DNS records.
Checking your DNS update
status (outside of your ISP):
In the event you're becoming impatient, and or are
wondering if the rest of the world outside of your ISP can
access your new site, you can proxy yourself to another
network and test it there. In many cases, you'll be
surprised to see your site responding perfectly, yet when
you attempt it directly from your ISP's servers, it does
not exist.
There are several services, which allow anonymous surfing
across the net. While this is not the intent here, they
can be used for trouble shooting domain resolution
problems. How? Because they proxy you through their
network, which means your URL requests are controlled by
"their" DNS cache records. These services update/expire
their DNS cache far more often than ISP's, which makes
them well suited for testing your domain name through a
network, which operates with the latest DNS updates across
the web.
To run this check, you can try accessing your site through
one of these two services:
https://www.safeweb.com/o/_s:top.php3
http://www.anonymizer.com/
Both of them allow you to enter a
URL, and proxy your request through their servers. If your
site is accessible from these servers, then chances are,
your ISP has yet to expire their old DNS cache records.
Working on your account during the DNS propagation period:
You can still work on your new account until your domain
name finds it way to our servers using your "IP Number",
which was included in your welcoming email. Your IP number
is how your new domain will be identified on our servers.
Using it at this point will provide a means for you to
access your account, as well as test your new site by
using something like http://
211.94.122.26/ (obviously you'd replace it with
the IP number we sent you).
One easy way to check and see if your domain is answering
to our servers yet, is to create a file called "test.html"
and place it in your web directory. Keep checking
the URL
http://www.yourdomain.com/test.html and see if it
works. When it does, you'll know your domain name is
answering to your account on "our servers", and has been
officially transferred.
The
personal DNS (for advanced webmasters).
Personalized Name Servers are generally used by webmasters
who will be reselling web hosting accounts, and want to
add a professional look to their DNS. Why? If you're
reselling accounts under your own entity, you could use
our name servers, which would be sent to your customers in
the form of:
NS1.MazeCreatorHosting.net 69.57.152.164
NS2.MazeCreatorHosting.net 69.57.152.165
Not bad, but what if you want your DNS settings to appear
as a part of your company? Let's say your company was
www.yourwebhost.com. If you desire, you could setup your
own custom branded DNS, which could display as:
NS1.YOURWEBHOST.COM 69.57.152.164
NS2.YOURWEBHOST.COM 69.57.152.165
This provides a somewhat more professional look to your
customers when sending out your DNS settings in a
welcoming email. In addition, if someone does a WHOIS
lookup on your domain name, it appears as your personal
DNS, as opposed to the company you're reselling for. Not
really a big deal, but some webmasters do not want to
advertise the host they're reselling for, as they feel it
does not portray a professional and independent look.
Personal name servers are offered to clients whom are a
part of our (reseller program). If you're not a reseller,
please use the standard DNS settings we provided you.
There is no superior advantage to having your own name
server unless you're a reseller, and or a web designer who
is also planning on hosting the websites they build.
Setting Up Sub Domains
What is a Sub-Domain?
A sub domain is one,
which resides under your top-level domain name, but in
many ways behaves as a "totally independent domain".
You'll observe that many of the larger corporations use
these, as they're somewhat more professional looking, and
do a better job of creating an independent precedence for
service or product lines, which appear as separate web
entities.
Example: You're a GM dealer with a site such as GM.com.
You sell everything from Pontiac's to Cadillac's. To
better organize your online presence, you could create sub
domains for your various automotive lines. These would
appear as
http://pontiac.gm.com/ or
http://cadillac.gm.com/.
Also note that in most cases, the domain need not be
called with the http:// or www protocol. pontiac.gm.com
can be called exactly how it appears here.
Setting up a sub domain:
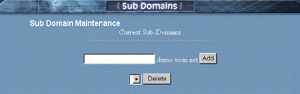
Thanks to C-Panel, this
task has been made easier than ever and can be achieved as
follows:
1. Login to C-Panel
2. Select Sub Domains
3. Enter the name
of your new
sub domain
4. Hit "Add"
That's it! Your new sub domain is now ready for use. To
find it, login to your "main web directory" through
C-Panel by selecting "files" or simply use your favorite
FTP client. You'll see it residing as another directory.
Upload your files to this directory just as you would with
any other. For example, if you created pontiac, then a
directory called pontiac is what you'll be looking for.
Independent cgi-bin
All new sub domains are created with their own independent
cgi-bin. This means your new sub domain operates
independently of everything else, and is almost like
having a whole new domain. Feel free to configure all cgi
scripts, which are pertinent to the functioning of this
sub domain. A nice feature, as it saves your main cgi-bin
from becoming cluttered and somewhat disorganized;
especially if you utilize a lot of cgi programming.
Independent email for the
new sub domain - (In
final development)
Yes, you'll observe
duplicates of all "configured pop email accounts"
appearing beside the sub-domain, and or all sub-domains
you've created. Now I know you'll be tempted to use (what
appears to be) a perfectly good email address's, BUT
please "Don't!" This is a feature that is in final
development. While it may look somewhat confusing at
first glance, it's really not. In the near future, you'll
be able to configure these email accounts for use with
your sub-domains. For example, if you configured support.yourdomain.com,
then you'll be able to use the address
mailto:tom@support.canada000.com.
For the time being, please configure
email address's that correspond to your standard
"top-level" domain, and just ignore the sub-domain
duplicates. ALSO: Any duplicate sub-domain email
address's you see appearing in your pop mail setup
configuration "DO NOT" count towards your allocated number
of pop mail boxes we've provided.
Configuring Domain Email Systems:
Adding a Pop Email account:

The
difference between private pop mail accounts, and simply
using the "Catch-All" method:
There are two kinds of email address's you can use,
starting with the "catch all" method:
With the catch all method, you don't have to worry about
setting up individual pop mail accounts. Simply set your
email client to your "default" email address (displayed in
C-Panel), and "all" email sent to
anything@yourdomain.com will land in this box, or
whatever you've set your default address to. This is an
easy way to catch all email sent to your domain.
In your Email client, feel free to
configure multiple outgoing accounts at
many-different-names@youdomain.com. It really doesn't
matter, as
everything@yourdomain.com will land in the default
account. Therefore, you would configure all of your email
accounts with the "same" Username and Password as your
"Default domain Email Account."
EXAMPLE: Let's say you want to
receive mail from
mailto:dianne@canada000.com and mark@yourdomain.com.
If both of these addresses are the ones you'll be using,
then the only thing that changes is the address - the
Username and Password is "always" the same.
The pop email account
method:
In this case, you configure a
"private" pop email account for one or many users who will
be receiving and sending email from your domain. Once an
email address is configured as a pop mail account, it
operates privately and independently from your main
standard/default mail system. Any mail sent to a private
pop mail account "can only be received" by logging into
that account with the separate username and password you
have assigned it.
Your default "catch all" account
will not intercept any mail being sent to a pop mail
account, which is what makes it 'private'. Pop 3 accounts
are useful if there are a number of people (for example
employees) who would each need a private email account.
This way, everyone at your company can utilize private
email. The default email address plays a slightly
different role in this case: If a sender uses the 'wrong'
Email name or syntax, then that message would bounce to
your "default catch all" account, and at which time, you
could probably figure our who the sender was trying to
contact. They do however, have to at least send it to your
correct domain name, (i'e',
oops@youdomain.com).
This would end up in your "default" mailbox.
How to configure a pop mail
account:
1. Login to
C-Panel
2. Select "Add/Remove accounts"
3. Select "Add Account"
4. Enter an email name
5. Select "Create"
Just enter a name, (the @yourdomain
part is added automatically)
That's it, done! Your private pop 3
email account is now ready for use. If you're a little
lost on how to manually configure an email account into
your mail reader, please see the detailed tutorials on how
to configure Outlook and Netscape mail readers.
SPECIAL
NOTE!
If you've enabled Sub-Domains,
you'll observe a duplicate email account appearing, which
corresponds to each sub-domain you've added. Please
ignore these duplicate addresses for the time being. This
is a new feature under development and will soon enable
the ability to configure email accounts for your
sub-domains. For example, if you configured
support.yourdomain.com, then you'll be able to use the
address
mailto:tom@support.canada000.com.
For the time being, please configure
email address's that correspond to your "regular"
domain, and just ignore the sub-domain duplicates. ALSO:
Any duplicate sub-domain email address's you see appearing
in your pop mail setup configuration "DO NOT" count
towards your allocated number of pop mail boxes we've
provided. In short, just ignore them for now :-)
Setting Your Default Email Address:

It appears pretty simple, but read
through this documentation, as this controls much more
that you'd expect. As mentioned in the previous chapter,
your "default email address" is the one, which can be used
as a "catch all", or in other words, to "catch all mail",
which is addressed to
anything@yourdomain.com. Using a catch all can be a
blessing and sometimes a curse.
The "catch all" is excellent if you
have a high frequency of people whom mistype your email
address, as these addresses (even though mistyped), will
simply be bounced to your "catch all" or "default" email
account. That is, providing they at least managed to spell
your domain name properly :)
If you're not planning on using
multiple "private email boxes", then you can keep life
very simple - just configure the default email address in
your mail reader and leave it at that. This way, you'll
receive everything sent to your domain. There are indeed
pro's and con's to this method, which will be discussed in
this tutorial.
Setting your default/catch
all email account:
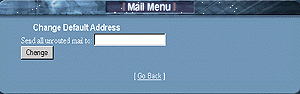
Note:
By
default, or until you change it, the default email address
will be the same as your "login name."
1. Login to
C-Panel
2. Select "Default Address"
3. Select "Set Default Email
Address"
4. Enter a desired default email
address
Just enter a name, (the @yourdomain
part is added automatically)
Select
"Change" and you'll see a confirmation box, which
displays your new default email address. That's it- done!
Remember: In order to receive mail, which
finds its way into your "Default Mailbox", you must
configure the default address in your mail reader. If you
don't, then all mail, which bounces to this address will
sit on the server unread. This is easy to do in Outlook
Express, as it allows you to configure and monitor
multiple email accounts. Email readers such as Netscape
on the other hand, are limited to "one" email
account. Actually, you could re-configure your mail reader
to check your default email box every few days, but who
wants to be bothered with that trouble? We suggest using
an email reader, which allows you to configure multiple
email accounts.
The
Webmail Alternative:
You can also check
your default email account, or another other mail account
by logging into it through the "WebMail" interface.
Simply select the "WebMail" icon at the bottom of C-panel,
and log in to it using your "Main Account"
Username and Password. This will allow to to check your
default email box, as well as other mailboxes without
having to configure them in your mail reader. In fact,
using any pop accounts "Username and Password" will log
you into that particular account through the "WebMail"
interface.
The downside of enabling
"Catch All":
Problems can sometimes arise when Spammers or junk mailers
use this feature as a means to pump their trash into your
mailbox. As long as the "catch all" is enabled, then all
they must do is send to
whatever@yourdomain.com and it will reach you.
On the other hand, if you're using
"specific pop email accounts", you could opt to disable
the "catch all", which would mean that "only visitors or
associates who you've given a specific address to" can
send mail to a particular email account on your domain.
In this case, everything else, (that
you have not configured as a pop mail account) is bounced
back to the sender. In our opinion, we suggest leaving
your "catch all" enabled for the time being. If Spammers
begin sending random junk messages using
anything@yourdomain.com, then you can disable your
"catch all" feature.
Disabling your "Catch All Feature"
Instead of entering a (syntax legal name), use illegal
syntax, which will effectively disable your email "catch
all." For example, using characters, which are known as
'illegal' to the email system such as (>>>????)
will work just fine. These are characters, which cannot
be used in an email address, which in effect, will render
the "Catch All" feature useless. Go to your "change
default email address" and add something like the above as
default name.
What
happens now?
When Spammy or Jimmy junk mailer attempts to use a random
email address to Spam you, it will be bounced back to
them. That is, unless they happen to get a hold of one of
your "legitimate pop email account names", in which case,
you'd have a different problem on your hands. Yes, you
could either deal with it, or change the address.
Here is what now happens to
a sender using anything@yourdomain.com :
This is what the sender would receive. Please note that a
classic, but annoying junk mail example is being used
here:
This message was created
automatically by mail delivery software (Exim).
A message that you sent has not yet been delivered to one
or more of its
recipients after more than 24 hours on the queue on
yourdomain.com.
The message identifier is: 14m7gv-0007gl-00
The date of the message is: Mon, 04 June 2001 01:23:02
-0400
The subject of the message is:
MAKE MILLIONS FAST!
The address to which the message has not yet been
delivered is:
anything@yourdomain.com
Delay reason: error in alias file /etc/valiases/anything@yourdomain.com:
missing or malformed local part (expected word or "<") in
"******>>>" (Bad email
syntax)
No action is required on your part. Delivery attempts will
continue for
some time, and this warning may be repeated at intervals
if the message
remains undelivered. Eventually the mail delivery software
will give up,
and when that happens, the message will be returned to
you.
So what actually happened
here?
When the "Catch All" email address (******>>>@yourdomain.com),
attempted to process an incoming message from
anything@yourdomain.com,
and then forward
the (junk message in this case) to the "catch all/Default"
email address, it freaked out, and said forget it!! The
default email address was set to ******>>> in this case,
which is clearly an email address using "illegal
characters", so the sending process was aborted.
Therefore, the mail system bounced back the above error
message to the sender. There are numerous tricks and
special recipes you can 'manually' write into the Unix
email system for doing essentially the same thing, however
through C-Panel, this would certainly seem the easiest way
of accomplishing the task.
Configuring Email Auto Responder's

What
is an Email Auto Responder?
Email auto responders will automatically send a customized
auto response (that you compose) to any visitor whom
emails the address configured with one. More specifically,
automated responses are sometimes used to send additional
information about your service or product by having a
visitor email something like
moreinfo@yourdomain.com. In most other cases, they are
used to send a 'courtesy reply' to anyone whom sends a
query to your companies main email address. When visitors
email this address, they recieve a response such as:
Thanks for contacting our company! Someone will be
returning a response to your question soon. If you require
immediate assistance, please call 555-222-1212. Thanks!),
and so forth.
There are two types of Auto
Responders:
The silent Auto Responder:
In this case, you configure the responder to send the
desired information when it's emailed, however you
'do not' receive copies of the inquiries that
people originally sent. This method is typically used if
you have a product and want people to email an address for
additional information on it. You simply tell them to
email
moreinfo@yourdomain.com, and they receive additional
information on it. Again, you 'will not' receive receipts
of the visitors emailing the auto responder. If you want
to do this, please read the next paragraph.
The Auto Responder that
sends you the original inquiry:
In this case, the auto responder is setup to work with a
(currently configured pop email account). Now,
the sender receives your automated response, and you
receive their 'original inquiry'.
How to setup an Auto
Responder:
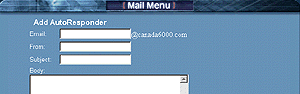
1. login to
C-panel
2. Select "Auto Responders"
3. Select "Add Auto Responder"
4. Enter the "Email Address"
to send the auto response
5. Enter a "From"
name,
(for example, my company)
6. Enter a "Subject", (for example, thank you)
7. Enter your message in the "Body"
area
Select
"Create" and that's it! Your auto responder is now
online. To test it, email its address and see if you
receive the auto response. If you've configured it to an
existing pop mail account, you should receive 2 responses.
The first, which is your inquiry, (that you just sent to
yourself), and the second, which will be the automated
response.
Remember!
If you
want to receive the "Incoming Inquiries" in addition to
sending the automated response, then add an email address,
which is "already" configured as a "pop email
account." If you "do not" wish to receive the
original incoming inquiry, then simply enter a name, which
"Is Not" configured as one of your existing pop mail
accounts.
If at anytime you want to update, edit, or delete an auto
response, simply go back into "Auto responders" and you'll
see the current responders configured, as well as options
beside each of them to change or delete.
Blocking Unwanted Email Messages:

From time to time, you may
experience either a junk mailer or some other menacing
individual whom keeps sending you annoying email messages.
C-Panel has a built in feature, which allows you to block
these email messages in a multitude of different ways. You
can block them by:
- Sender
- Subject
- Message Header
- Message Body
Of course, if all you want to do is block one specific
email address, then you don't have to worry about getting
fancy with it - just enter the email address to be
blocked, and that's it, done!
How to use the block email
function:
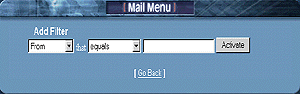
1. Login to
C-Panel
2. Select "Block an Email"
3. Select "Add Filter"
If all you want to do is block a
single email address, then simply leave the "current
default setting" as is, and enter in the email address to
be blocked. For example,
annoying-nolife@nothingbettertodo.com
Click
"Add Filter", and that's it
done!
When you click "Back" or login to this feature next time,
you'll see the list of email address's, and or expressions
you've blocked. Beside each one of them will be a "Delete"
option, so that you can remove the block from your account
at a future time. NOTE: When you block an
email address, or some other keyword, this filtering will
be enabled on "All Email Accounts" within your domain.
Advanced Blocking:
For those of who whom experience frequent problems with
junk email messages, you'll be please to see this option
provides a broad range of blocking options. Instead of
having us try to explain every last one of them here, this
is a feature you'll really want to experiment with
yourself.
Doing so, will allow you to become
familiar with the ways that email can be blocked, and will
also help you with customizing a recipe that works best
for your domain. Play around with the settings, and try to
block words, or phrases based on the From Name, Subject,
or Message Body Text. Now, send an email to your account
and see if the terms and criteria you selected are
providing the filtering you want.
It may take a little time to master, but it's fun, and a
great way to broaden your abilities on web site
administration. FINAL NOTE: If you're
totally new to email blocking, and wish to explore its
full potential, we highly suggest you test it before
launching your site. This way, you don't have to worry
about accidentally disrupting email for your entire
domain.
Hint: Unless you're
100% sure of what a setting will do, always delete it when
you're finished, or until you have time to run a series of
tests on it. You want to ensure it's blocking what it's
supposed to, and not legitimate email
messages!
A big junk mail problem:
If you're experiencing a high volume of junk mail, then
there's a good possibility Spammers are taking advantage
of your "catch all" option. To disable this, please see
our tutorial on "Default Email Address."
Email
Forwarding:

Email forwarding is a feature, which
forwards an email that originated from your domain, to
another email address. The forwarding address can be
another email address within 'your domain', or to an
'external email' address, (for example to your home ISP
email account). There are two types of email forwarding:
Forward silently to another
address:
In this case, the email address from your domain (setup
for forwarding) will divert all messages to the forwarding
address you've selected, and without sending you a copy of
the original message. For example,
you@yourdomain.com
will automatically forward all messages to
you@mindspring.com.
Pretty straight forward. (no pun intended).
Forward to another address,
but also send you the "original inquirey":
This is the method most commonly used. For example, you
have two other partners who wish to receive all incoming
inquiries to the company. Perhaps you're the one who
responds to them, but your counterparts would like copies
of the incoming activity as well. The method for
accomplishing this is pretty well the same as above,
except in this case you would configure one of your
"existing pop email accounts", as that is how you'd
receive a copy of the original incoming message.
Example: When
General@company.com (your companies main address) is
mailed, you would typically be the only one to receive the
response, however if you've configured forwards for your
two counterparts (Bob and Mary), then
bob@doodles.com
and
mary@yourdomain.com
could also receive a copy of the incoming messages.
How to setup a mail forward:
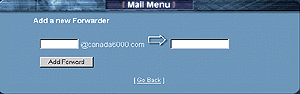
1. Login to
C-Panel
2. Select "Forwarders"
3. Enter a configured pop email
account name if you want to recieve original
inquiries. (Enter a none configured email address if
you do not)
4. Enter the email address
you want it to relay a copy of the message to
5. Select "Add Forward"
All messages will now
be forwarded to the forwarding address, and with a copy
sent to you
Need to
Forward to more than one person?
Simply repeat the above process
using the same address you've setup as the forward, and
enter the additional recipients you would like to send a
copy of the message to. All email forwards will be listed
in your "Email Forwarder" administrator. You can delete
forwards when you no longer require them,
Testing your forward.
If you want to test your new mail forward, it's
recommended that the email account you're testing from "is
not" one of the accounts you're using in conjunction with
the forwarder you've just setup. For example, if you've
configured
harry@yourdomain.com to forward copies to
bob@doodles.com
and
mary@yourdomain.com,
then send a test message from an email address, other than
one of the addresses you've just setup, otherwise it can
somewhat confusing in figuring out which message was
coming from the actual forward, and which was the original
sent from you.
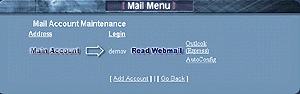
Accessing your mail through the web based interface
C-Panel extends the versatility of its
email system by allowing you to access any one of your
email accounts through its own web mail interface. You
have the choice of accessing all mail through the web, or
any of your private pop email accounts. Gone are the days
of having to create several email accounts on various free
html based mail systems, as now you have your own, which
operates from "your account."
Accessing your mail through
the web mail interface:
1. Login to C-Panel
2. Select "Add Remove Accounts"
Beside the email
account you wish to access, Select the
"Read WebMail"
button. A
username and password prompt will appear, and are the
same as the username and password you created with that
particular account. NOTE: Remember to use the
"full' email address as the account login name for
the account you're accessing.
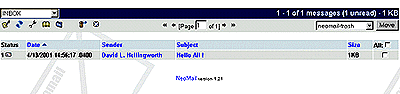
The first screen you'll see:
If it's the first time you're accessing this email account
through WebMail, a setup screen appears. Actually, all
this really does is display how you'll be identifying
yourself in email messages. Everything is pretty much the
same as what you setup the "original pop mail account"
with, however check it closely and make sure everything is
appearing as you want it.
Does everything look
correct?
If so, then click "Save" and a dialog box pops up, which
confirms your settings as being saved successfully. Click
"Continue" and you'll be
taken to your WebMail inbox. To the top left of the
screen, you'll observe the following icons. Clicking on
any one of them will do the following.
Notes:
|
 |
Compose a
new message |
|
 |
Refresh the
screen |
|
 |
View user
preferences |
|
 |
Open address
book |
|
 |
View or add
new folders |
|
 |
Empty your
trash folder |
To delete or move a message, select
the small box beside it. Select where you which to place
it using the drop down menu (top right of screen), then
click "Move".
- Open address
book, allows you to add and edit email address's .
You can also export your Outlook
or Netscape Address Book,
which equips your
account with all the email address's
you currently use.
|